Showing posts with label diy. Show all posts


Recently, thanks to the abundance of Facebook yard sale pages in our area, my name is getting out there as someone who would gladly refinish your furniture for you (btw, thank you friends). Unfortunately, it seems that everyone is looking for me to do it out of the kindness of my heart or practically for free.  I consider myself to be a generous person but this is how I make a living, this is how I provide for my daughter.  I began to feel frustrated and defeated when I wouldn't hear back from the person I provided a ballpark figure for.  Then it dawned on me...maybe the non DIY'ers out there don't understand what all goes into turning an old, weathered piece of furniture into a piece that will stand the test of time & be passed down for generations.  Sure, I could just throw a coat or two of spray paint on it and give it back to you for $50 but you would be very dissatisfied and unhappy with the service I provided you.  Let me explain to those who will listen what goes into providing a stunning piece of refinished furniture.

First there is the cleaning.  I have come close to losing my much lunch on several occasions during this step. I STRONGLY suggest a mask, goggles and latex gloves (and maybe a barf bag):


Depending on the condition of the piece of furniture you're refinishing you may need to strip a few layers of paint off in order to get the desired finish you're looking for.  FYI chemical burns hurt, people:


Hopefully you'll be one of the lucky ones and won't find any hidden gems under all of that paint:


Heat mark from a baked potato


Which brings me to repairing. Many times the client won't even realize that there is a need for repair but once I see it, it cannot be unseen. I will fix the problem or do whatever is possible to make it less noticeable:


Now it's time to patch, fill and sand the dickens out of it:
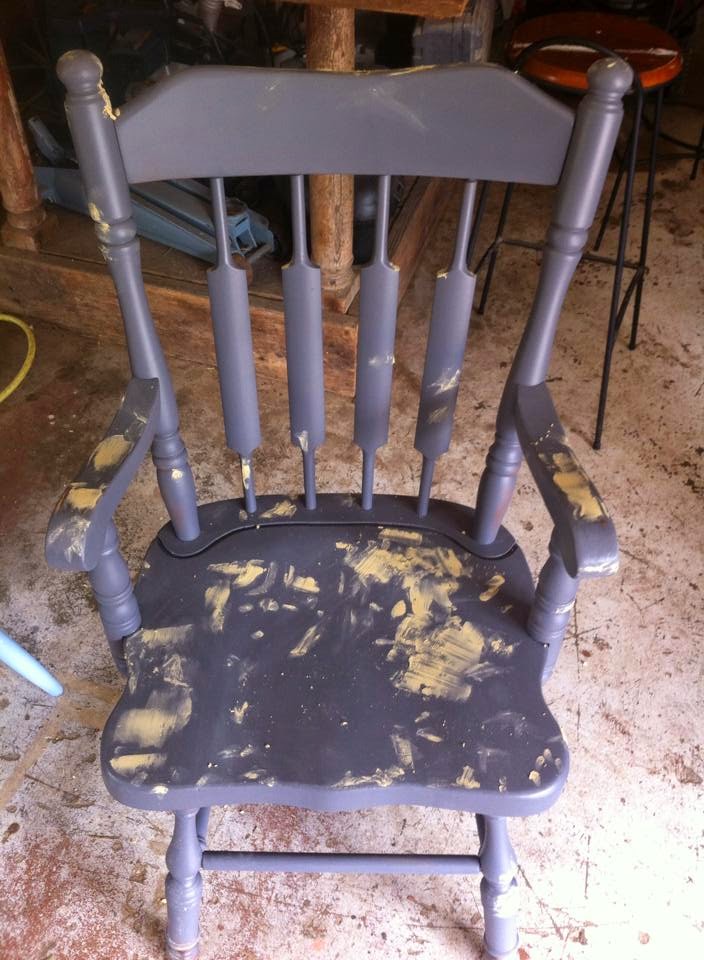

It's time to prime! Priming is a very important step in order for the paint to adhere to the furniture properly. Apply one coat of primer, let dry and then hand sand the entire piece with a very fine sanding block until it's smooth like butta (there is a huge difference in smoothness after sanding). Repeat one to two times depending on the primer and coverage. Kilz oil based primer is my primer of choice:


FINALLY...it's time to paint. I trek out to my preferred place of paint mixing (Ace is the place with the helpful hardware folks) and find the color you desire.  I usually stick with Benjamin Moore but Clark and Kensington has come a long way.  While I'm there I also pick up all of the roller covers, extra sanding blocks and anything else I may need to complete your beautiful project. Apply one coat, dry, sand, repeat...1-2 times.

Ahh...at last, you're done.  Hahahaha, not so fast.  You now have to apply two to 3 coats of finish if you would like your gorgeous piece of furniture to last through moves, children and every day wear and tear.  This is by far my least favorite step.  I call it the finicky finishing step (there MAY be another F word in there by the time I get here).  You have to be very attentive and patient during this process, one wrong move and you're starting over from the beginning, which is never fun, trust me.  If I applied paint to the furniture I use water based polycrylic, if I applied stain I use oil based polyurethane. TDF TIP: If you don't want your beautifully painted, white dresser to yellow over time DO NOT use polyurethane to finish the project. I hope you picked up that pricy synthetic brush while you were at the hardware store because not just any brush will do (I'm not being sarcastic here, no brush has worked for me but the Purdy Syntox brush).  Apply a thin, even coat over the entire piece of furniture, be sure to only brush in one direction to eliminate brush marks and avoid over brushing to cut down on bubbles. Let dry for several hours. Grab that super fine sanding block again and get to sanding (do your arms hurt yet). I'm not over exaggerating when I tell you that you will need at least two coats of protective finish but three would provide the best protection.


Clearly I don't use chalk paint.  I've tried it before and didn't like the finished product but I kind of wish I did so I could eliminate a few of these steps and save myself some time. 

So I wonder...how much would you charge to paint a large dresser or a dining room table and six chairs for someone? Owning your own business and knowing your worth isn't always easy but I've quickly learned that the people who are looking for great quality and durability won't mind paying for it and I can't get offended if someone thinks my prices are too high, to each their own. 

Just remember when you're requesting quotes for someone to do any kind of work for you, whether it's furniture refinishing, house cleaning or lawn mowing, you get what you pay for so be cautious of the cheap guys.


I kid, the only stripping I did was of the painted furniture kind. ;) I did, however, learn some very valuable lessons while working on multiple pieces of furniture and trying different techniques during my time off so I thought I would share them. I stress...these are MY opinions, not everyone will agree.

1. I despise chalk paint of any kind. I have tried Annie Sloan, Maison Blanche and even mixed my own following Pinterest directions. What I found was I paid $40 for a quart of paint and still needed more than 2 coats on most things. I thought I was paying for convenience but it didn't work that way for me. The chalk paints dry too fast for me to work with.

2. The wax. I don't understand how all of you fabulous furniture refinishers deal with that stuff? It seems to add more time and elbow grease to each project with an icky sticky feeling that you will never get from the Poly brothers (acrylic and urethane). For example; if you want to add an antique finish to a piece of furniture you must first go over it with 2-3 coats of your paint color, then you wax it with your clear wax, buff that off so you can then go over the entire thing again with the dark wax and buff that off. WHO HAS TIME FOR THAT?? *side note: of the waxes that I tried Maison Blanche was the easiest to work with.

3. I am a Benjamin Moore girl, through and through. I love their sample cans and will use their paints from now on.

4. I was not born to be a stripper. No seriously, it took me one entire day to strip the black paint off of a dining table. My dad originally painted it and all I can say is...he does phenomenal work. I hate to change anything my dad has done but the black was no longer working for me.

5. Never buy a black dining table again! They are impossible to keep looking nice.

6. I have a girl crush on Nicole Curtis. That chick could kick both of the Property Brothers butts and look beautiful doing it. Yes, I watched A LOT of DIY network during my time off.

7. I have a passion for woodgrain. I try to find a way to always keep a little. If I'm not careful all of my pieces are going to look the same.

8. Working at a computer all day has murdered my hand strength. I had to get weekly manis just for the hand massage. I know...the struggle. ;)

9. I'd be a really awesome stay at home mom. Except no bills would be paid because there is no "go to work dad."

10. The most important thing I've learned is that I have taken the easy road, for the most part, in life. I got a comfortable job that paid the bills at 20 years old and just got stuck there. I never had a passion for anything except being a good mother until I built my first headboard. Getting the time off to devote to my passion was an amazing gift and blessing. It was exactly what I needed to see that in order for me to expect my daughter to follow her dreams and passions when growing up I must first follow mine. Our children do as we do, not as we say. I want to lead by example. Big changes coming soon. 😘

Man, have I been slacking with keeping up with this blog.  I have four or five projects that I have completed since my last post (in February) that I will be posting about within the next couple of days. I just wanted to make it clear that I did not do all of these in a weekend, ha, I wish.

The job that pays the bills is with the federal government so I had a couple of beautiful weeks off in September to do what I actually love and I took full advantage of it.  My first project was refinishing a drop leaf coffee table that I got for $20 from the Sweet Clover barn in Frederick, MD.  When I found it I could see that there was something truly beautiful under all of that nasty gunked up polyurethane.

Top:

It only took me about an hour with my electric sander to sand off the multiple layers of poly. Once I was sure I got all of the grossness off I wiped it down with mineral spirits and let it dry over night. I then tried the Minwax's wipe on polyurethane in clear satin for the first time and LOVED it. I will never use the brush on version again. I applied 3 coats of poly to the top of the table and sanded with a sanding block between each coat.

Base:

For the base I used Maison Blanche "Vanille" and then distressed it with with 220 sandpaper.  I then went over it with Valspar Translucent Color Glaze in "Mocha" with a dab of the Valspar Clear Mixing Glaze. I worked in small sections brushing on and then wiping off the glaze.

My $20 purchase
 
I'm loving what I'm seeing after a little sanding

 
Delicious


What my deck looked like during most of the furlough


My intention was to sell this table to compensate for not being paid while being furloughed but when I was done I couldn't part with it...thank goodness we were back paid. :)


So it was more of a 2 weekends kind of project but the winter weather put me in a funk the first weekend AND my Ravens played in the Super Bowl so I had legitimate excuses. ;)  The first weekend consisted of me asking my brother Tom (my DIY superhero, always coming to my rescue) for a bunch of favors; can I borrow your truck, can you cut all of this wood for me, do you have sawhorses I can borrow...you get it.  Luckily my sister in law was out of town so his "Honey Do" list wasn't as long as it could have been, and as always he was happy to help.


After almost 2 hours spent in Home Depot on a scavenger hunt for all of the items on my list I was $200 poorer but so excited to get started on my Headboard project. Oh, I should probably mention that I also added a vanity to the to do list, that's what all of the piping and plumbing items are for.


The first weekend I cut, conditioned, stained and applied one coat of polyurethane to each board (for more detailed instructions I got the inspiration from Jenny Highsmith and followed her instructions almost to the tee, where I didn't I will let you know).  The only thing I did differently in these steps was use a polyurethane that was applied with a  foam brush not the spray on version.


The second weekend I decided to sand each board because I had visions of my hair being pulled daily by their roughness. I applied another coat of poly and let them dry over night.  I was much happier with the look of the sanded boards, as well as the feel.  Now the fun part, the assembly.  I placed the boards just like she did and screwed them all together. The 1.5 screws were not long enough to go through the supporting board and the headboard part to secure them well enough so I went back out and got 2.5 inch drywall screws (Tom said they were better to use because they are more coarse). I also used a drill bit to pre-drill each hole. I STRONGLY suggest doing this, it may seem like it's more time consuming but it actually saved me time because without it the screws were not going in correctly and I was having a heck of a time.


Here is a before shot of my bed room.  I'm actually embarrassed now looking at this, what am I, a college kid who can't afford real furniture? Haha...


With the help of my awesome nephew I was able to get the extremely heavy headboard in place...


I absolutely LOVE my new big girl bed. The ONLY thing I would have done differently is measured the width of my mattress and boxspring to make sure the support posts were inside of that measurement.  I don't like that you can see the posts but I will camouflage it somehow. :) 


Since the lights blur out the little details here is a side view if you are sitting on the bed:


Isn't it romantic? I love it, what do you think?

Whoops, almost forgot, here are some pictures of the vanity I made as well (also inspired by Jenny Highsmith). If I could just get those pesky Home Depot price and size stickers off I'd be happy.


Primping station before (sitting on the floor) and after! :)


I believe I have just found this weekend's DIY project and I am more excited than a normal person should be.  I have been without a headboard and real night stands since I moved into my house (a year and a half ago). I was just searching for DIY nightstand ideas expecting to find painted tables or some sort of makeshift nightstands I could throw together. And then I found this *cue the tada music*....


I may have just found this Jenny Highsmith gal but after reading a little bit of her blog, I think it and I will be great friends. She explains things clearly and includes pictures of every step. You would seriously think I was about to go shopping for diamond jewelry with someone elses credit card with as much excitement as I have right now to go to Home Depot.  My room may finally look like a grown up lives in it by Monday.  Fingers crossed!

So I've decided to take the plunge into the deep dark waters of blogging. This may start off a little bumpy but with a lot of practice I hope to get it down. My blog will be a lot like a journal. The journal of a 30 something single mother of one, who loves to fix things, build things and repurpose things but is also somewhat obsessed with fashion on a budget, learning how to wear make up (yes at 34) and playing with my hair.

As I write this, my first post, I have a clear idea of what I'd like to focus on:

- Current projects
- Ideas for future projects
- How I can turn what I have in my closet into the outfit I found on Pinterest that I love
- How I fixed'er up (household maintenance)
- The joys and 'Jesus take the wheel' moments of motherhood
- Dating...and how bad it sucks (note: for their privacy and protection real names will not be used) ;)

Sounds fun, right? I'm actually really excited. So long Facebook!
Powered by Blogger.

Flickr

Contact Us

Name

Email *

Message *

Search This Blog

Random Posts