So it was more of a 2 weekends kind of project but the winter weather put me in a funk the first weekend AND my Ravens played in the Super Bowl so I had legitimate excuses. ;) The first weekend consisted of me asking my brother Tom (my DIY superhero, always coming to my rescue) for a bunch of favors; can I borrow your truck, can you cut all of this wood for me, do you have sawhorses I can borrow...you get it. Luckily my sister in law was out of town so his "Honey Do" list wasn't as long as it could have been, and as always he was happy to help.
After almost 2 hours spent in Home Depot on a scavenger hunt for all of the items on my list I was $200 poorer but so excited to get started on my Headboard project. Oh, I should probably mention that I also added a vanity to the to do list, that's what all of the piping and plumbing items are for.
The first weekend I cut, conditioned, stained and applied one coat of polyurethane to each board (for more detailed instructions I got the inspiration from Jenny Highsmith and followed her instructions almost to the tee, where I didn't I will let you know). The only thing I did differently in these steps was use a polyurethane that was applied with a foam brush not the spray on version.

The second weekend I decided to sand each board because I had visions of my hair being pulled daily by their roughness. I applied another coat of poly and let them dry over night. I was much happier with the look of the sanded boards, as well as the feel. Now the fun part, the assembly. I placed the boards just like she did and screwed them all together. The 1.5 screws were not long enough to go through the supporting board and the headboard part to secure them well enough so I went back out and got 2.5 inch drywall screws (Tom said they were better to use because they are more coarse). I also used a drill bit to pre-drill each hole. I STRONGLY suggest doing this, it may seem like it's more time consuming but it actually saved me time because without it the screws were not going in correctly and I was having a heck of a time.
Here is a before shot of my bed room. I'm actually embarrassed now looking at this, what am I, a college kid who can't afford real furniture? Haha...
With the help of my awesome nephew I was able to get the extremely heavy headboard in place...
I absolutely LOVE my new big girl bed. The ONLY thing I would have done differently is measured the width of my mattress and boxspring to make sure the support posts were inside of that measurement. I don't like that you can see the posts but I will camouflage it somehow. :)
Since the lights blur out the little details here is a side view if you are sitting on the bed:
Isn't it romantic? I love it, what do you think?
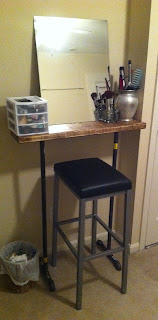
Whoops, almost forgot, here are some pictures of the vanity I made as well (also inspired by Jenny Highsmith). If I could just get those pesky Home Depot price and size stickers off I'd be happy.
 |
| Primping station before (sitting on the floor) and after! :) |